The Ultimate Volume Balancing Cheat Sheet for Mixing (2026 Guide)

Introduction
The foundation of any professional audio production lies not in complex equalizers or expensive analog compression algorithms, but in the fundamental balance of audio levels. If a track is poorly leveled, no amount of advanced processing will save the final product. Understanding how to balance volume in a mix is the most critical skill an audio engineer must develop.
By utilizing a reliable volume balancing cheat sheet, producers can eliminate the guesswork, achieve optimal clarity, and build a sturdy foundation for the mastering stage. This guide provides a comprehensive methodology for establishing a flawless static mix from the ground up.
Key Takeaways of the Article
- A static mix is built using only volume faders and panning controls, completely bypassing audio effects.
- Proper gain staging and maintaining sufficient headroom on the master bus are non-negotiable prerequisites.
- Anchoring the mix to the kick drum provides a reliable baseline for setting all subsequent db levels for mixing.
- Employing techniques like the pink noise method and mono compatibility checks guarantees translation across all speaker systems.
What is a Static Mix? (The Foundation of Volume Balancing)
A static mix represents the very first phase of the audio mixing process. It involves setting the absolute volume levels and stereo panning positions of every individual track before any equalization, compression, or spatial effects (like reverb and delay) are introduced. A high-quality static mix guide emphasizes that 80% of a track’s clarity is achieved in this phase alone. If the static mix sounds cohesive, the subsequent processing stages simply enhance an already solid foundation.
Interesting Fact
“The fader attached to each track is the single most powerful mixing tool you have. Why? Because mixing is all about balance, and the heart of balance is volume.” — Recording Revolution.
The Golden Rule: Gain Staging and Headroom
Before moving any faders, the engineer must understand gain staging and headroom. In digital audio, the absolute maximum volume limit is 0.0 dBFS (Decibels Full Scale). If the master channel exceeds this limit, digital clipping occurs, resulting in harsh, unmusical distortion.
To prevent clipping and leave room for the mastering engineer to operate, producers must maintain adequate headroom. The standard practice dictates that the loudest peak on the master fader should register between -6.0 dB and -3.0 dB during the busiest section of the song. Understanding the relationship between these mixing levels and the final commercial loudness is crucial; for a deeper dive into this ecosystem, review the complete guide on mixing vs mastering.
The Volume Balancing Cheat Sheet (Step-by-Step)
To achieve professional results, engineers should construct the mix sequentially, establishing the core rhythmic elements before introducing melodic and atmospheric layers.
The Kick Drum (The Anchor)
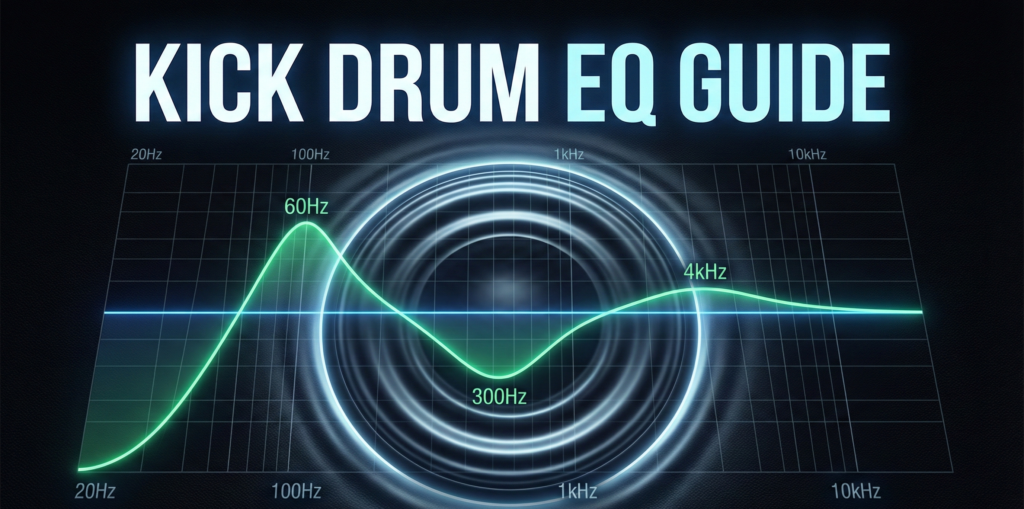
In genres heavily reliant on rhythm, such as hip-hop, cinematic beats, and electronic music, the kick drum serves as the anchor. The producer should loop the loudest section of the track and set the kick drum fader so it peaks consistently around -10.0 dB to -12.0 dB. Every other instrument will be balanced relative to this anchor. To ensure the kick cuts through without simply raising the volume, engineers should consult a dedicated kick drum EQ strategy.
Bass and 808s (The Low-End Relationship)
The relationship between the kick and the bass dictates the power of the track. The sub-bass or 808 should sit just below the kick drum in volume, typically peaking -2.0 dB to -4.0 dB lower than the kick. If the bass is too loud, it will consume all available headroom. It is vital to understand what is fundamental frequency to ensure the bass and kick are not clashing at the exact same pitch.
Vocals and Lead Melodies (Front and Center)
Once the low-end foundation is set, the primary focal point of the track must be introduced. Vocals or lead synthesizers carry the narrative of the song. These elements should be placed front and center, balanced so they sit clearly on top of the drum groove without completely masking the snare or kick.
Snare and Claps (Cutting Through)
The snare drum or primary clap provides the backbeat and drives the energy forward. In modern production, the snare is typically balanced to be almost equal to the kick drum, or slightly lower (peaking around -11.0 dB to -12.0 dB if the kick is at -10.0 dB).
Hi-Hats and Percussion (High-Frequency Control)
A frequent mistake among novice producers is mixing high-frequency percussion too loudly. Hi-hats cut through mixes easily because the human ear is highly sensitive to the 2 kHz – 5 kHz range. Hi-hats should provide rhythm and swing, not pain. They should be tucked neatly behind the snare.
Synths, Strings, and Cinematic Textures (The Background)
Pads, orchestral strings, and atmospheric textures serve as the background environment. These elements should be panned widely to the left and right and kept relatively quiet. They exist to glue the track together, not to compete with the lead melodies or the drum transients.
Exact dB Target Ranges (Quick Reference Table)
This mixing levels cheat sheet table provides approximate target ranges.
Disclaimer: These are starting guidelines, not absolute laws. Always trust the ear over the visual meters.
| Instrument Group | Target Peak Level (Anchor: Kick at -10 dB) | Mix Purpose |
| Kick Drum | -10.0 dB | The rhythmic anchor and headroom benchmark. |
| Snare / Clap | -11.0 dB to -12.0 dB | The primary backbeat and rhythmic driver. |
| Bass / 808 | -12.0 dB to -14.0 dB | Low-end weight (must sit under the kick). |
| Lead Vocal / Synth | -11.0 dB to -13.0 dB | The focal point of the listener’s attention. |
| Hi-Hats | -18.0 dB to -20.0 dB | High-frequency pacing and groove. |
| Pads / Textures | -20.0 dB to -24.0 dB | Stereo width and atmospheric glue. |
Pro Techniques for Perfect Volume Balance
To refine the initial static mix, professionals employ several technical methodologies to verify their db levels for mixing are accurate.
The Pink Noise Trick
Pink noise is a frequency spectrum where every octave carries equal power, mimicking how human hearing perceives balanced audio.
- Insert a Pink Noise Generator plugin on the master output.
- Set the noise volume to peak at -12.0 dB.
- Pull all instrument faders down to -inf.
- One by one, slowly raise each instrument fader until the sound is just barely audible over the pink noise.
- Mute the pink noise. The resulting static mix will offer an incredibly balanced starting point.
Mixing in Mono
Modern audio playback systems range from massive club stereo arrays to single Bluetooth speakers. By placing a utility plugin on the master bus and forcing the output to Mono, the engineer forces all audio into a single central channel. This immediately highlights volume imbalances. If a synth disappears or a vocal becomes overwhelmed by guitars when switched to mono, the volume balancing is flawed.
The Low-Volume Test
Due to the Fletcher-Munson curve (which dictates that human ears perceive low and high frequencies differently at various volumes), loud monitoring can trick an engineer into thinking a mix sounds powerful. Producers should turn their studio monitors down to the volume of a quiet conversation. If the kick, snare, and vocal remain clearly distinguishable at this whisper-quiet level, the volume balance is perfect.
Common Volume Balancing Mistakes
Understanding how to balance volume in a mix also requires knowing what pitfalls to avoid.
| Common Mistake | Consequence | Professional Solution |
| Mixing in Solo | Context is lost. An instrument may sound great alone but terrible in the mix. | Always adjust volume faders while the entire track is playing. |
| Ignoring Masking | Two instruments fighting for the same frequency causes the producer to just turn one up, eating headroom. | Use EQ to carve out space rather than reaching for the volume fader. Consult a mixing cheat sheet for frequency carving. |
| Fader Creep | Constantly turning elements up one by one until the master bus clips. | If an element is too quiet, try turning competing elements down first. |
Conclusion
Achieving a professional-sounding track begins with mastering the static mix. By utilizing this volume balancing cheat sheet, maintaining strict headroom discipline, and relying on proven referencing techniques like mono-checking and low-volume testing, producers can ensure their instrumentals translate powerfully across all listening environments. Remember that while dB targets are excellent starting points, the ultimate judge of a mix is always the human ear.
FAQ
Industry standard practice dictates that the loudest peak on the master output should hit between -6.0 dB and -3.0 dB. This ensures the mastering engineer has enough dynamic headroom to apply final equalization and limiting without inducing digital distortion.
Clip gain should be used first to normalize the raw audio files to a consistent level (e.g., ensuring a vocal recording is relatively even before it hits any plugins). Faders should then be used to perform the actual aesthetic mixing and balancing of the track within the context of the entire arrangement.