How to Install a Reaper Cubase Skin (Full Guide)
")
Introduction
For decades, Steinberg Cubase has been considered the industry standard for film scoring, orchestral mockups, and complex MIDI programming. However, as projects grow in scale, many composers find themselves seeking software with a lighter CPU footprint. Cockos Reaper provides unparalleled performance and routing capabilities, but its default utilitarian interface can disrupt the established workflow of a migrating composer. By modifying the graphical user interface, audio engineers can merge the aesthetic familiarity of Steinberg with the technical stability of Cockos.
If you want a deep dive into the technical differences regarding MIDI handling and CPU usage, check out our full Cubase vs Reaper performance breakdown before tweaking your UI. This tutorial outlines how to completely overhaul the workspace to match the Steinberg environment.
Key Takeaways of the Article
- Reaper’s visual interface can be fully customized using community-developed .ReaperThemeZip files without altering the core audio engine.
- Applying a dedicated theme restores the dark, high-contrast visual environment preferred by cinematic composers.
- Replicating the Steinberg experience requires importing custom .ReaperKeyMap files to restore familiar transport and zoom shortcuts.
- The MIDI Editor in Reaper can be docked and configured to function exactly like the Cubase Key Editor.
Quick Answer
To transform your interface, you must download a dedicated Reaper Cubase skin (like the ‘CubicPack‘ theme) from the official Reaper Stash. After dragging the .ReaperThemeZip file into your workspace, you should also import a custom .ReaperKeyMap to replicate Steinberg’s standard keyboard shortcuts and MIDI editor behaviors.
Why Apply a Cubase Theme to Reaper?
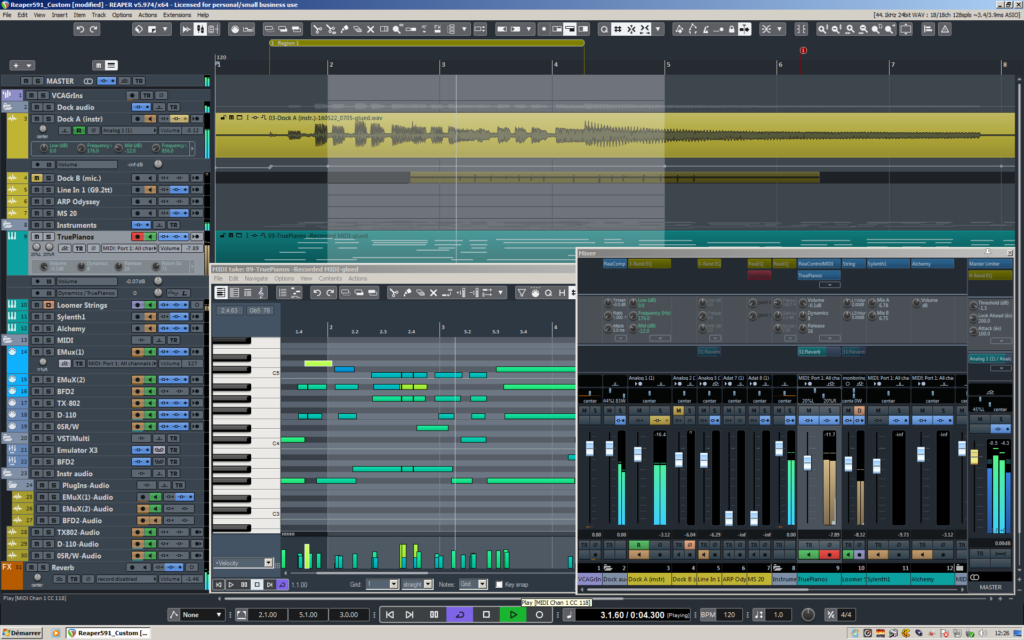
Cubase is universally praised by film composers for its logical layout, specifically its handling of high track counts and massive orchestral VST libraries like Native Instruments Kontakt. Its dark, sleek interface minimizes eye fatigue during long sequencing sessions. Reaper, out of the box, does not cater specifically to MIDI composers, presenting a highly raw, spreadsheet-like layout.
By applying a custom theme, producers achieve a dark, structured environment that visually separates MIDI regions from audio items, highlights active tracks more clearly, and structures the mixer in a familiar console format. This reduces cognitive load, allowing beatmakers and electronic producers to focus on cinematic orchestration rather than navigating an unfamiliar digital environment.
Step 1: Download the Best Reaper Cubase Skin
To begin the visual transition, users must source a third-party modification. Cockos provides a centralized hub for community uploads known as the Reaper Stash. Due to copyright restrictions, theme developers often utilize altered names for their creations.
To find a high-quality Reaper Cubase skin, users should navigate to the Reaper Stash website or the official Cockos forums and find the most popular option in community themes:
- CubicPack: A highly accurate replication of the Cubase Pro 10/11 interface.
Once a suitable theme is selected, download the associated file to a local directory. The file must possess the .ReaperThemeZip extension.
Step 2: How to Install the Theme
The installation process in Reaper relies on a highly efficient drag-and-drop mechanism, completely bypassing the need to manually navigate through hidden system folders (AppData or Application Support).
- Launch Cockos Reaper and open a blank project.
- Locate the downloaded .ReaperThemeZip file in the operating system’s file browser.
- Click and drag the file directly into the main Reaper arrangement window.
- Release the mouse button. The software will briefly freeze and then instantly redraw the entire interface using the new Steinberg-inspired assets.
To verify the installation or toggle between different interface options, users can navigate to the top menu bar and select Options -> Themes.
Step 3: Importing Cubase Keyboard Shortcuts (Keymaps)
Visual adjustments only solve half of the migration problem. Muscle memory dictates workflow speed. In the Steinberg ecosystem, pressing G and H controls horizontal zooming, while C toggles the metronome. In Cockos software, these keys trigger entirely different actions.
To map these commands efficiently, users must import a custom shortcut configuration.
- Download a Cubase layout .ReaperKeyMap file from the Reaper Stash.
- In Reaper, open the top menu and navigate to Actions -> Show action list…
- Click the Key map… button located at the bottom of the window.
- Select Import shortcut binding… and open the downloaded file.
Table 1: Essential Cubase Keyboard Shortcuts to Remap in Reaper
| Steinberg Shortcut | Default Reaper Action | Needed Action in Reaper Action List |
| G / H | Group items / Un-group | View: Zoom out horizontal / Zoom in horizontal |
| C | Insert tempo marker | Options: Toggle metronome |
| J | No default action | Item: Toggle mute for selected items |
| * (NumPad) | No default action | Transport: Record |
Step 4: Tweaking the MIDI Editor for Composers
The Steinberg Key Editor is famous for its dedicated lower-zone docking, allowing composers to view the arrangement and the piano roll simultaneously. Reaper opens the MIDI Editor in a floating window by default.
To replicate the lower-zone Key Editor:
- Double-click any existing MIDI item in the arrangement to open the MIDI Editor.
- Right-click the empty gray space on the top toolbar of the MIDI Editor window.
- Select Dock window from the context menu.
- By default, Reaper may dock this to the bottom of the screen (the Bottom Docker). If it docks elsewhere, click the exclamation mark tab (!) at the bottom of the docker and select Attach docker to main window -> Bottom.
- Within the MIDI Editor, navigate to View -> Piano roll timebase and select Project synced to ensure the MIDI grid perfectly aligns with the main arrangement window above it.
Reaper vs. Cubase UI (Terminology Guide)
When navigating the newly modified software, users must understand how Cockos labels its internal tools compared to Steinberg. Use the following data matrix table as a translation guide for daily operation.
Table 2: Reaper vs. Cubase UI Terminology
| Steinberg Cubase Term | Cockos Reaper Equivalent | How to Find it in Reaper |
| Inspector | Track Control Panel (TCP) | Default left sidebar attached to tracks. |
| Key Editor | MIDI Editor | Double-click any MIDI item on the timeline. |
| MediaBay | Media Explorer | View -> Media Explorer (Shortcut: Ctrl/Cmd+Alt+X). |
| MixConsole | Mixer | View -> Mixer (Shortcut: Ctrl/Cmd+M). |
| VST Instruments Rack | FX Chain / Track FX | Click the FX button on any individual track. |
| Audio Part | Media Item | Any block of audio or MIDI on the timeline. |
Conclusion
By leveraging the open-source nature of Cockos software, composers no longer have to choose between aesthetic comfort and CPU performance. Installing a custom skin, configuring the MIDI editor docker, and establishing familiar key commands creates an environment that perfectly serves electronic producers and film scorers alike. Reaper’s GUI flexibility is endless. If you ever switch ecosystems, you can just as easily make Reaper look like Logic Pro in a matter of seconds.
FAQ
Yes. Custom themes are created entirely from scratch by community members using graphic design software and Reaper’s proprietary scripting language (WALTER). They do not utilize stolen or proprietary code from Steinberg software, making them completely legal to download and use.
No. A DAW theme only alters the host software’s native interface (transport bar, track headers, faders, and mixer panels). Third-party plugins, such as Xfer Serum, Native Instruments Kontakt, or FabFilter equalizers, operate with their own independent graphical user interfaces and will look identical regardless of the applied DAW theme.
When importing a .ReaperKeyMap, Reaper will overwrite any default shortcuts that conflict with the new imported commands. However, any default shortcuts that do not conflict with the new Cubase mapping will remain completely intact and functional.