The Ultimate Mixing Cheat Sheet: EQ, Compression & Levels for 2026

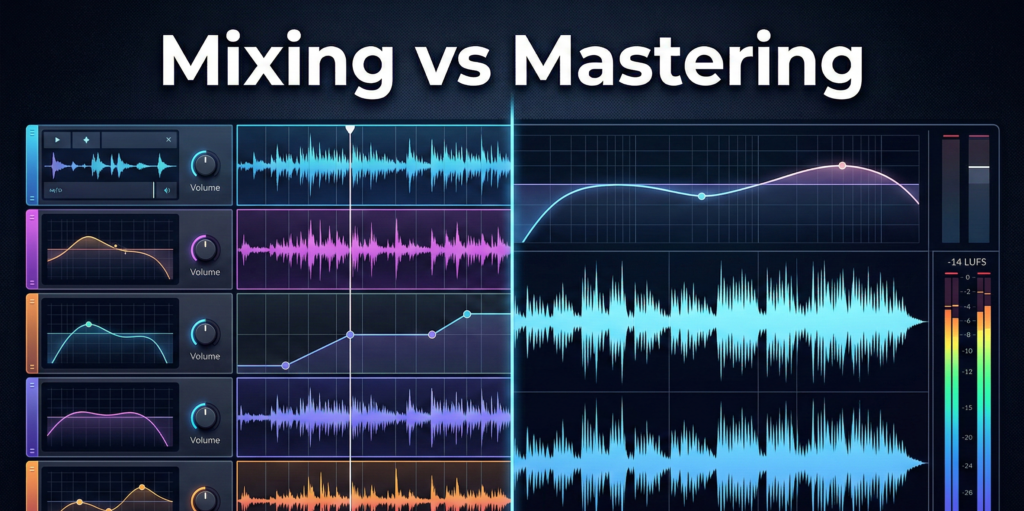
Mixing is often described as an art form, but it relies heavily on the laws of physics and mathematics. While every song is unique, seasoned engineers recognize that certain starting points yield consistent results. A reliable mixing cheat sheet serves as a roadmap, helping producers navigate the complex relationships between frequency, dynamics, and space without getting lost in the technical details.
This guide provides a structured reference for setting levels, applying eq settings, and configuring compression. It is designed to act as a baseline for the 2026 production workflow, ensuring a clean, professional mix foundation.
Introduction
The goal of this guide is to provide safe zones—specific numerical ranges for volume, frequency, and time-based effects—that work for 80% of modern genres. By strictly adhering to a proper equalizer map and gain staging protocol, the mix engineer can prevent muddy low-end and harsh high frequencies before they occur.
Note: These values are starting points. The final decision must always be based on critical listening.
Step 1: Gain Staging & Volume Balance
Before touching a plugin or an equalizer cheat sheet, the static mix (volume balance) must be established. Modern digital mixing (32-bit float) offers ample headroom, yet maintaining proper gain staging ensures plugins react predictably and the master bus does not clip.
The “Safe Zone” Reference Levels
To achieve a dynamic mix with enough headroom for mastering, the following peak levels are recommended for the loudest sections of the track.
- Kick Drum: -10dB to -8dB
- Snare Drum: -12dB to -10dB
- Lead Vocals: -10dB to -8dB (should sit on top of the mix)
- Bass: -15dB to -12dB
- Guitars/Synths: -18dB to -15dB
- Master Bus Headroom: Aim for -6dB to -3dB peak before mastering.
The Pink Noise Technique
For a quick, objective balance, many engineers utilize a pink noise reference.
- Insert a pink noise generator on a separate track set to -12dB.
- Solo the pink noise and one instrument (e.g., the Kick).
- Adjust the instrument volume until it is barely audible over the noise.
- Repeat for all elements.
Step 2: EQ Cheat Sheet
Equalization is the primary tool for carving space in a mix. A proper eq guide helps identify problematic frequencies and enhancing sweet spots. Below is a comprehensive eq frequency chart detailing specific eq points for major instruments.
Understanding the Frequency Spectrum
To utilize an eq spectrum effectively, one must understand the main zones:
- Sub Bass (20Hz – 60Hz): Felt rather than heard.
- Bass/Body (60Hz – 250Hz): The foundation of rhythm.
- Mud/Boxiness (250Hz – 500Hz): Often requires cutting to clear up the mix.
- Presence (2kHz – 5kHz): Where human hearing is most sensitive.
- Air/Brilliance (10kHz – 20kHz): Adds expensive sheen.
Instrument-Specific EQ Chart
The following equalizer chart outlines the best equalizer configuration for standard instruments.
| Instrument | High Pass Filter (HPF) | Cut (Problem Areas) | Boost (Sweet Spots) |
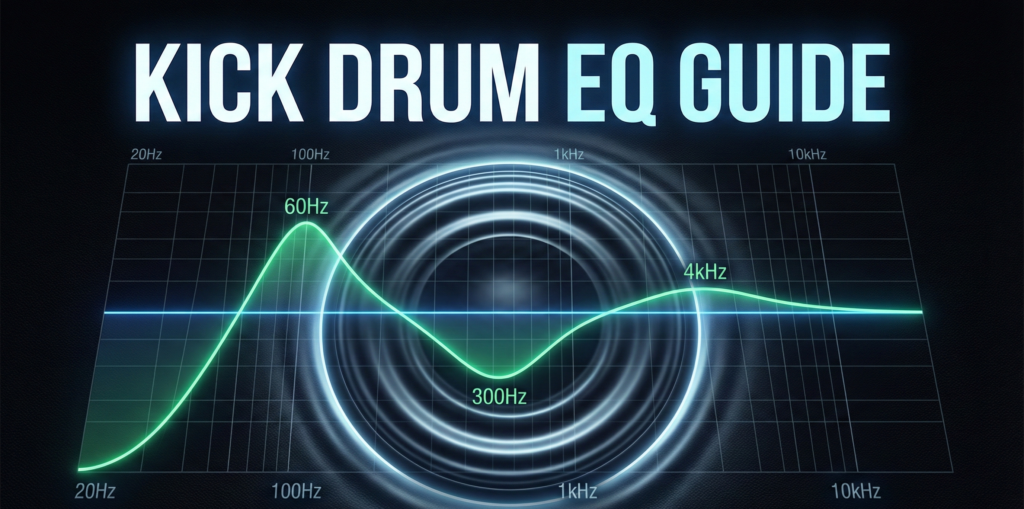
| Kick Drum | 30Hz – 40Hz | 250Hz (Boxiness) | 60Hz (Thump), 4kHz (Click) |
| Snare | 80Hz – 100Hz | 400Hz (Cardboard) | 200Hz (Body), 8kHz (Snap) |
| Bass | 30Hz – 40Hz | 150Hz – 200Hz (Boom) | 700Hz – 1kHz (Growl) |
| Guitars | 80Hz – 100Hz | 300Hz (Mud), 3kHz (Harshness) | 1.5kHz (Bite), 8kHz (Presence) |
| Synths | 100Hz – 150Hz | 350Hz (Cloudiness) | 5kHz (Definition) |
Vocal EQ Cheat Sheet
Vocals require delicate handling. Use this vocal eq cheat sheet to ensure clarity.
- Roll-off: Apply a High Pass Filter at 80Hz – 100Hz to remove mic rumble.
- Mud Cut: Wide cut between 250Hz – 350Hz to remove “chestiness.”
- Nasality: Narrow cut around 800Hz – 1kHz.
- Presence: Gentle boost at 3kHz – 5kHz for intelligibility.
- Air: High shelf boost above 10kHz for a modern pop sound.
High and Low Pass Frequencies Cheat Sheet
Using filters is the quickest way to clean a mix. This high and low pass frequencies cheat sheet prevents frequency masking.
- Everything except Kick/Bass: HPF at 100Hz.
- Hi-Hats/Cymbals: HPF at 300Hz.
- Reverb Returns: HPF at 600Hz (Abbey Road Trick) and LPF at 10kHz.
- Distorted Guitars: LPF at 12kHz to remove digital fizz.
Step 3: Compression Cheat Sheet
While eq cheat sheets handle tone, compression handles dynamics. Setting the correct attack, release, and ratio is crucial for “gluing” the track together.
Compression Settings Guide
- Vocals (Consistency):
- Ratio: 2:1 to 4:1
- Attack: Fast (5ms – 15ms) to catch peaks.
- Release: Medium (60ms – 100ms).
- Gain Reduction: Aim for -3dB to -6dB.
- Drums (Punch):
- Ratio: 4:1
- Attack: Slow (30ms) to let the transient “crack” through.
- Release: Fast (20ms – 50ms) to reset before the next hit.
- Bass (Locking it down):
- Ratio: 4:1 to 8:1
- Attack: Medium (20ms).
- Release: Medium (100ms).
- Mix Bus (Glue):
- Ratio: 1.5:1 or 2:1
- Attack: Slow (30ms – 50ms).
- Release: Auto (program dependent).
- Threshold: Only catch the loudest peaks (-1dB to -2dB reduction).
Step 4: Reverb & Space Guide
Reverb creates the illusion of physical space. Using a mixing cheat sheet for reverb times prevents the mix from washing out.
Reverb Decay Times
- Room / Ambience: 0.4s – 0.8s. Used on drums and rhythm guitars to add dimension without a long tail.
- Plate: 1.5s – 2.5s. The standard for pop vocals and snares. It is bright and dense.
- Hall: 3.0s+. Used on orchestral elements, pads, and atmospheric leads.
The Pre-Delay Secret
Pre-delay separates the dry signal from the wet reverb signal.
- Vocals: Set pre-delay to 20ms – 60ms. This keeps the vocal “in your face” while still having an epic tail.
- Drums: Set pre-delay to 10ms – 20ms to preserve the transient punch.
Step 5: Panning Strategies
An eq sheet helps vertical stacking (frequencies), while panning handles horizontal width.
LCR Panning (Left-Center-Right)
Many pros swear by LCR panning to create wide mixes.
- Center: Kick, Snare, Bass, Lead Vocal.
- Hard Left (100L): Rhythm Guitar 1, Synth Pad L, Backing Vocal L.
- Hard Right (100R): Rhythm Guitar 2, Synth Pad R, Backing Vocal R.
- Fill the Gaps: Hi-hats (30L or 30R), Toms (panned to match stereo image).
Frequency Panning Rule
Low frequencies contain high energy and should remain mono.
- Below 120Hz: Mono (Kick, Bass).
- Above 120Hz: Can be expanded to stereo.
Conclusion
This Ultimate Mixing Cheat Sheet provides the foundational data needed to build a professional mix. By utilizing the equalizer map to carve out frequencies and adhering to standard compression ratios, the producer eliminates 80% of common mixing errors.
Remember that an eq chart or eq graph is a visual aid, not a rulebook. Every eq cheat sheet should be used as a starting coordinate. Once the technical values are set, close your eyes, trust your ears, and adjust until the emotion of the track comes through.
FAQ
Yes, the principles in a live sound eq cheat sheet are very similar to studio mixing. However, live sound often requires more aggressive cuts in the low-mids (200Hz – 400Hz) to combat room resonance and feedback.
Treat eq frequencies as search zones. If a guitar sounds muddy, start searching at 300Hz as suggested by the eq guide, but sweep the frequency to find the exact problem spot for that specific recording.
Most DAW stock plugins now include a built-in eq spectrum analyzer. You can also print out the eq frequency chart provided in Step 2 of this guide for quick reference.
The High Pass Filter section is the most critical. Removing unnecessary low end using the high and low pass frequencies cheat sheet clears up headroom more effectively than any other move.
Start with a subtractive approach. Use the eq settings to cut bad frequencies before boosting good ones. Cuts should generally be narrow (high Q), and boosts should be wide (low Q).